In our previous Article, we had seen some basic commands of MongoDB in action. Now, we would connect our PHP to MongoDB.
We already know how to install MongoDB driver for PHP and how to install MongoDB as Windows Services. Next in our PHP file, we start connecting to MongoDB as shown below.
<?php
ini_set('display_errors', 1);
// Let's connect without Authorization
$mongo = new MongoClient();
// GET Connections
$mongoConnections = $mongo->getConnections();
// IF Connection Found
if (false === empty($mongoConnections))
{
// LIST Databases
$dbs = $mongo->listDBs();
// Show List of DataBases
echo "<b>Showing All the DB Names :</b> ";
foreach($dbs['databases'] as $d)
{
$dn = $d['name'];
echo "<br>Database Name : $dn" ;
// Select the database
$p = $mongo->{$dn};
// Get all the Collections
$c = $p->listCollections();
echo ", Collections are : ";
foreach($c as $n)
{
echo "[$n] ";
}
}
// Select our Database within the 1
// position within the $dbs array
$db = $dbs['databases'][1]['name'];
$db = $mongo->{$db};
// Select a collection say "myDatabase"
$col = $db->myDatabase;
// get all records
$records = $col->find();
// Iterate and show
foreach($records as $key=>$val)
{
echo "<br>First Name : " . $val['fname'] .
", Last Name : " . $val['lname'] .
", Roll : " . $val['roll'] .
", Status : " . $val['status'] ;
}
// INSERT a new ROW in that Collection
// Insert a Document to Collection
$arr = array('fname' => 'Amiya', 'lname' => 'Sengupta',
'roll' => '33', 'status' => '4');
$col->insert($arr);
// If we want to create a New Collection, JUST
// use its name, Mongo will automatically create it
$col = $db->PassedStudents;
// Insert a Document to Collection
$arr = array('fname' => 'Adhuna', 'lname' => 'Muland',
'roll' => '10', 'status' => '3');
$result = $col->insert($arr);
// Check if INSERT was successful
if($result['ok'] != 1)
echo " INSERT ERROR";
// CREATE A NEW COLLECTION called 'Publisher'
$publisher = $db->createCollection(
"publisher",
array(
'capped' => true,
'size' => 10*1024,
'max' => 10
)
);
// Insert some records in Publisher
$arr = array(
'name' => 'General Publisher',
'address' => '10, Peter Road, Zip 2343',
'phone' => '9876543210');
$result = $publisher->insert($arr);
}
else
{
// Not connected
echo "MongoDB not connected";
}
?>
The above code is quite self-explanatory. We have the MongoClient object available with us. This object helps us to interact with MongoDb database.
Some points which need to be noticed here are :
1. listDBs() gets all the Database available. This is equivalent to "show dbs" command in Mongo Shell.
2. listCollections() gets all the collections available within the database.
3. find() is used to find all records within a collection. The find() method returns a MongoCursor object
4. insert() is used to INSERT record into collection
Check the output below ::
In our next article, we'll see various ways of querying Mongo.
In our previous article, we have seen installation of MongoDB on our C: drive (Windows Environment) at path "c:\mongodb\" and installed it as a Win32 Service. Now let's try to work with a bit. Let's do some basic Database stuffs.
Open command prompt and set path to the "c:\mongodb\bin" directory as shown below :
path=%path%;c:\mongodb\bin\
%path% refers to "path" environment variable; We are just appending new path to it.
Next, we type "mongo" to start the Mongo Shell where we can run certain commands to do specific database tasks. See below what happens when we start the Mongo shell :
MongoDB uses "Collections" which is similar to "Tables" in any R/DBMS. It also uses JSON like name/field value pair and such pairs are called "Documents". Here, JSON field value pairs are in BSON (Binary JSON) format which have additional type information.
Next, we would try some commands at the prompt.
1. db :: Will show you current Database
2. show dbs :: will show list of Databases
3. use mytestdb :: (without quote), Switch to a Database "mytestdb" even though it may not exist.
Now, we'll try CRUD (Create, Read, Update, Delete) operations. Let's insert some data inside a table called 'students' in 'myDatabase' Database.
1. use myDatabase
2. db.myDatabase.find()
3. db.myDatabase.insert({'fname':'Atal','lname':'Singh','roll':1})
4. db.myDatabase.insert({'fname':'Arin','lname':'Sen','roll':2})
5. db.myDatabase.insert({'fname':'Avik','lname':'Roy','roll':3})
6. db.myDatabase.insert({'fname':'Anik','lname':'Paul','roll':4})
7. db.myDatabase.insert({'fname':'Amal','lname':'Sen','roll':5})
8. db.myDatabase.insert({'fname':'Ajay','lname':'Dev','roll':6})
9. db.myDatabase.find()
10. show collections
The first command selects our database myDatabase.
The second command issues a SELECT SQL command with no parameter specified. So it returns all the record in the collection 'myDatabase'.
The 3 to 8 commands inserts individual records into that collection.
The 9th command again returns/shows all the records in that collection.
The 10th command shows all the tables/collections within current selected database
Now we will try to filter the return records, i.e add "WHERE" clause to "SELECT" command.
Say, we require names of all the students whose last name is 'Sen'. So we need issue a command like this :
db.myDatabase.find({ 'lname':'Sen' })
Here we wanted an exact match of lastname 'Sen'. However for a LIKE type query, we need issue following command.
db.myDatabase.find({ 'lname': /Sen/ })
We just used a REGEXP to specify a LIKE Query.
The find() accepts 2 parameters, first parameter is for filtering (WHERE clause) and second parameter is for selected/returned fields/columns.
Some more SELECT Query examples ::
1) Select * from myDatabase where roll < 3 ORDER by roll DESC LIMIT 2
db.myDatabase.find({roll:{$lt:3}}).limit(2).sort({'roll':-1})
See that, after the field roll, we used a sub-document { $lt : 3 } where $lt is an operator and it takes 3 as argument.
If we need to look for those records where roll < 10 and roll > 5 then we need to write this way:
db.myDatabase.find({roll:{$lt:10, $gt:5}})
2) Select fname from myDatabase where lname like '%Sen%' and status = 1
db.myDatabase.find({'status':1, 'lname':/Sen/}, {'fname':1})
3) Select fname, lname from myDatabase where ( status = 0 OR status = 1) AND lname like "%Sen%"
db.myDatabase.find(
{ 'lname':/Sen/,
$or:[{'status':1}, {'status' : 0}]
}, {'fname':1, 'lname':1})
4) Select * from myDatabase where ( roll > 5 and roll <> 8 ) OR lname like "%Sen%"
db.myDatabase.find(
{ $or:[ {'lname':/Sen/},
{$and : [{'roll':{$ne:8}}, {'roll':{$gt:5}}]}
]
},{'_id':0,'roll':1})
db.myDatabase.find(
{
$or:[ {'lname':/Sen/}, {'roll':{$ne:8, $gt:5}}]
},{'_id':0,'roll':1})
Any of the above solution would work.
Note that '$ne' in MongoDB means '<>' in SQL, '$gt' in MongoDB means '>' in SQL.
Also '$gte' in MongoDB means '>=' in SQL.
5) Select * from myDatabase order by fname, lname DESC limit 10
db.myDatabase.find().sort({'fname':1, 'lname':-1}).limit(10);
6) Select count(*) from myDatabase
db.myDatabase.find().count()
db.myDatabase.count()
Any of the above commands will work.
7) Select distinct(fname) from myDatabase
db.myDatabase.distinct('fname')
Some UPDATE Query examples ::
1) Update myDatabase SET status = 5 where age > 16
db.myDatabase.update(
{age:{$gt:16}},
{$set : {'status':5}}, {multi:true})
2) UPDATE myDatabase set roll = roll + 3 where age < 15
db.myDatabase.update(
{age:{$lt:15}},
{$inc : {'roll':3}}, {multi:true})
Some DELETE Query examples ::
1) DELETE from myDatabase
db.myDatabase.remove()
2) DELETE from myDatabase where roll > 100
db.myDatabase.remove({roll:{$gt:100}})
3) DELETE from myDatabase where roll > 200 and status = 1
db.myDatabase.remove({$and:[{roll:{$gt:200}}, {status:1} ]})
In our next article, we'll write PHP code to do the above CRUD operations using MongoDB classes.
MongoDB is catching up faster. Before we connect it to our WAMP, let me share some important facts about MongoDB.
1. MongoDB is a Document DATABASE. These documents are equivalent to rows in a RDBMS table. These documents are in JSON format.
2. MongoDB supports scaling feature. The MongoDB database can spread over multiple servers. It scales OUT to multiple machine whereas Relational model follow a Scale UP pattern so that data can be served from a single server.
3. MongoDB supports neither joins nor transactions. "Table JOINS" are handled by "embedded documents and linking"
4. MongoDB does not support JOINS - This is mostly true, There is a feature MongoDB 3.2 called $lookup, that does provide some limited join functionality.
5. MongoDB features secondary indexes, an expressive query language. MongoDB provides atomic operations on a single document.
6. Instead of Tables, MongoDB stores documents in Collections.
7. In MongoDB, the primary key is automatically set to the "_id" field.
8. it has Dynamic Schemas
9. MongoDB is NOT for systems that require SQL, joins, and multi-object transactions.
10. Two Storage Engines work, MMAPv1 and WiredTiger
11. While MongoDB writes to journal files promptly, MongoDB writes to the data files lazily.
12. Written in c++, MongoDB follows AGILE methodologies
In this article, I am going to show how we can connect PHP (Wamp in Windows environment) and MongoDB. I am using Wamp Server version 2.5 with PHP 5.5 and Apache 2.4.
A. We need to download MongoDB Community Edition from here ::
https://www.mongodb.org/downloads#production ( Windows MSI installation )
https://www.mongodb.org/dl/win32/x86_64-2008plus-ssl ( ZIP archive )
We need to install/unzip it in location like c:\mongodb. The location can be anything of our choice.
B. Download MongoDB driver for PHP php_mongo.dll from http://pecl.php.net/package/mongo/1.5.5/windows
We need to be very careful while selecting the DLL version here. I would suggest a 32 bit download as 64 bit version did not work for me though my WorkStation was a 64 bit one.
Now, we need to put this php_mongo.dll file in our Wamp installation folder as shown below :
C:\wamp\bin\php\php5.5.12\ext\
"C:\wamp" is the location where Wamp is installed on my work station. And the above is the location where all the PHP extensions are kept.
C. Now, let's do a little home work for setting up our MongoDB.
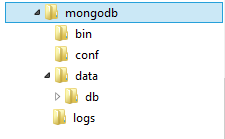
Create 3 more folders inside "mongodb" folder namely "conf", "data" and "logs". Also create a folder called "db" inside the "data" folder.
Check the folder structure as shown below :
D. Now create a configuration file called "mongodb.conf" or anything of your choice in the "conf" folder. This configuration will be loaded when the MongoDB starts running. We can have following content within that configuration file.
# where to log
logpath = C:\mongodb\logs\mlogger.log
# New Logs will be appended
logappend = true
# only run on localhost for development
bind_ip = 127.0.0.1
# Server PORT
port = 27017
# Enable REST interface
rest = true
# data lives here
dbpath = C:\mongodb\data
The above configuration has comments (lines starting with a hash) to understand what it means.
Log Path, DB path have been defined here. Port no. 27017 has also been provided here. So when we finish MongoDb setup, we would be able to run http://127.0.0.1:27017. The Log file name can be anything and it should exist.
E. Our next step will be installing MongoDB as an Windows Service. For this we have to run Command Terminal ...
mongod.exe --config Path-to-Config --install
Check the screenshot below
So, now if we check the Windows Services by running "services.msc", we'll see that a service called "MongoDB" has been successfully installed. If it is not automatically running, select it and click on "Start Service" button as shown in the screenshot below.`
So, now MongoDB is installed and is available from Browser at http://127.0.0.1:27017. Check the screenshot below.
The port number specified in MongoDB configuration file could have been anything else as well.
Now, with php_mongo.dll copied to the "ext" folder we just need to start Wamp.
When Wamp icon turns green in the System Tray, click on it. You can see "php_mongo" being listed there. Check the screenshot below.
As Wamp has started, our Web Server is available at http://127.0.0.1, hence if we run http://127.0.0.1?phpinfo=1 We can see that MongoDB library is successfully loaded. Check the screenshot below.
So far, we have started MongoDB Win32 service, and we made MongoDB available to our Wamp (Apache Server). So, if we run PHP codes for MongoDB (just the way we do mysql_query() for MySQL DB), it would smoothly run.
The process is almost similar in Xampp. We need to download the correct version of php_mongo.dll and keep it C:\xampp\php\ext\ folder. Next, we need to mention this mongoDB driver php_mongo.dll inside the php.ini file. And then restart the Apache server within Xampp. Check the screenshot below ..
In our next article, we would create a New Database and access it from within PHP itself.
Check the first part of this article here.
Continued..
8. Next, we need to show a contact form at the front-end. For this, we shall be following these points :
a. We'll create a shortcode
b. A function (say, 'myplugin_shortcode_handler()') will be assigned to it.
c. We can place or call the shortcode almost anywhere, within pages, posts, header or footer.
d. Whenever Wordpress sees the shortcode, it calls the myplugin_shortcode_handler() function.
So, we are just left with 2 jobs, i) create a shortcode and ii) define corresponding function 'myplugin_shortcode_handler()'. Let's do it one by one.
9. Within the same file xyz.php, we'll add the following line :
add_shortcode( 'myplugin', 'myplugin_shortcode_handler' );
The above line creates a shortcode '[myplugin]', which can be placed on almost all places. And Wordpress will call 'myplugin_shortcode_handler()' function when it encounters the above shortcode.
10. Now, we build the function 'myplugin_shortcode_handler()'. Check the code below :
<?php
function myplugin_shortcode_handler()
{
// Variables
$message = "";
$error = 0;
$myplugin_name = "";
$myplugin_email = "";
// Handle POST
if(isset($_POST['myplugin_btnsubmit']))
{
// GET POST Data
$myplugin_email = trim($_POST['myplugin_email']);
$myplugin_name = trim($_POST['myplugin_name']);
// Validation
if($myplugin_email!="" && $myplugin_name!="")
{
// Email Validation
if( filter_var($myplugin_email, FILTER_VALIDATE_EMAIL) )
{
// Send the contact mail
$recipient_email = get_option('myplugin_recipient_email');
if($recipient_email!="")
{
// SEND MAIL
$subject = "Contact Form";
$message = "Name : $myplugin_name <br>".
"Email : $myplugin_email";
$headers = 'MIME-Version: 1.0' . "\r\n";
$headers .= 'Content-type: text/html;' . "\r\n";
$headers .= 'From: $myplugin_name <$myplugin_email>' . "\r\n";
mail($recipient_email, $subject, $message, $headers);
$message = "Thank you for contacting us";
$error = 0;
}
else
{
$message = "Some error Occurred";
$error = 1;
}
}
else
{
$message = "Invalid Email Address";
$error = 1;
}
}
else
{
$message = "Name and Email can not be blank";
$error = 1;
}
}
// POST Handling part completed
// Now Generate the Contact Form
echo
"<form method='post' action=''>
<div class='myplugin_div'>
<div>
<span>Enter Name </span>
<input type='text' name='myplugin_name' value='".
($error?$myplugin_name:"")."'>
</div>
<div>
<span>Enter Email </span>
<input type='text' name='myplugin_email' value='".
($error?$myplugin_email:"")."'>
</div>
<div>
<input type='submit' value='Submit' name='myplugin_btnsubmit'></div>
</div>
<div class='myplugin_error'>";
// Show Messages if any
echo "<span style='color:" . ($error?'red':'green') . "'>". ($message!=""?$message:"") ;
echo "</span></div></form>";
}
?>
The above form includes the POST handling PHP code. Couple of things need to be said here ...
a. The <input> elements' names should NOT be like 'email', 'name' etc. These names are reserved by Wordpress. So the Form submission can land into 404 error page.
b. Notice, how we have called the get_option() to get the recipient email address where the contact detail will be sent.
Check a screenshot below :
The methods we followed in the example above, could have involved AJAX post method also. How to use Ajax in Wordpress has been discussed in the article Ajax calls in Wordpress - Part I.
Here we are going to discuss how we can create simple plugin in Wordpress 1.9.
The process is described below ::
1. We need to create a PHP file, say "xyz.php" inside the wp-content/plugins folder. The name of the file is not important. The Plugin details should be mentioned within a comment inside that file.
So, the file may start with the following ::
<?php
/*
Plugin Name: My TEST Plugin
Plugin URI: http://myplugin.com
Description: This is a TEST Plugin created by Chandan Patra
Author: Chandan Patra
Author URI: http://chandanpatra.blogspot.in
Version: 1.0
*/
?>
The above comment has various information about our Plugin. I have given the plugin a name "My TEST Plugin". Check how this will appear in the Plugin section in Wordpress Admin Panel.
2. We can create a new folder in wp-content/plugins and put the above file inside that also.
wp-content/plugins/my_plugin/xyz.php
3. Next, we need to activate our plugin by clicking on the "Activate" link.
Note :: Active plugins are listed in serialized form in 'wp_options' table with option name 'active_plugins'.
4. Now, let's add some functionality to our plugin. Let's create a small contact form with 2 fields, "Name" and "Email". When user fills up this form and hit the submit button, it generates a mail and sends it to a particular recipient's Email ID.
But, how our plugin would get the recipient email address? So, we need to create a Settings screen for our plugin where Admin can configure our plugin to work properly. There, Admin can put the recipient's email address also.
5. Creating a Settings page ::
To achieve this, we need to define our custom function (say, my_plugin_works()) which creates the Menu title etc and then add our custom function to a hook called 'admin_menu'. So, just below the Plugin information (as shown in point.1 above) in xyz.php file, we'll add the following code.
// So, we are adding our custom function
// 'my_plugin_works' to the 'admin_menu' hook
add_action('admin_menu','my_plugin_works');
// Here is the definition of our
// custom function
function my_plugin_works()
{
//this is the main item for the menu
add_menu_page(
'My Plugin', //page title
'My Plugin Options', //menu title
'manage_options', //capabilities
'my_plugin_opt', //menu slug
'my_plugin_func' //function
);
}
The above code would create a menu called "My Plugin Option" as shown in the screenshot below.
We have used the add_menu_page() function which takes 5 parameters as described above. The 3rd parameter should be "manage_options" which lets us create/change settings within Wordpress Admin Panel.
6. So, when the "My Plugin Options" menu is clicked, we are redirected to URL : http://127.0.0.1/wp/wp-admin/admin.php?page=my_plugin_opt.
The URL parameter 'my_plugin_opt' is supplied as 4th argument when calling add_menu_page() function.
7. And when we are redirected to the above URL, the function 'my_plugin_func' is going to be executed and this was passed as 5th argument to add_menu_page() function. So, now we need to define our my_plugin_func() function. Here is the definition ..
<?php
function my_plugin_func()
{
$message = "";
$error = 0;
?>
<form method="post">
<table style="width:500px" cellspacing="10" cellpadding="10">
<tr>
<td colspan='3' style='font-size:15px;font-weight:bold'>
My Plugin Settings</span> on your page
</td>
</tr>
<tr>
<td colspan='3' style='font-size:12px;font-weight:bold'>
Use shortcode <span style='color:blue;'>[myplugin]</span> on your page
</td>
</tr>
<tr>
<td>Enter Recipient Email Address </td>
<td>:</td>
<td>
<input type='text' name='email' value="<?php echo get_option('myplugin_recipient_email');?>">
</td>
</tr>
<tr>
<td colspan='3'><input type='submit' value='Submit' name='btnsubmit'></td>
</tr>
<tr>
<td colspan='3'>
<span style='color:<?php echo ($error?'red':'green') ;?>'>
<?php
// Shows Message
echo ($message!=""?$message:"");
?>
</span>
</td>
</tr>
</table>
</form>
<?php
}
?>
So, our custom function my_plugin_func() shows a Form where the recipient mail can be entered. Notice the line :
<input type='text' name='email' value="<?php echo get_option('myplugin_recipient_email');?>">
We have given a name for our settings as 'myplugin_recipient_email'. So, when the above form is shown, it tries to get option from Wordpress. The function get_option() is a Wordpress function which tries to get 'named' option from DB. Initially, it won't show populate the <input> field, however when we would be able to save the recipient email address as a named option ('myplugin_recipient_email') in database, this <input> field will be successfully populated.
Check, how the form looks like ...
Now, we need to add functionality to this form so that the recipient email can be saved. So, we are adding the PHP code that will save the Email address in database. Here is the full version of the function my_plugin_func() ::
<?php
function my_plugin_func()
{
$message = "";
$error = 0;
// Handle POST
if(isset($_POST['btnsubmit']))
{
$email_id = trim($_POST['email']);
if($email_id!="")
{
// Validation
if( filter_var($email_id, FILTER_VALIDATE_EMAIL) )
{
update_option('myplugin_recipient_email',$email_id,true);
$message = "The recipient Email saved successfully";
$error = 0;
}
else
{
$message = "Invalid Email Address";
$error = 1;
}
}
else
{
$message = "Email can not be blank";
$error = 1;
}
}
?>
<form method="post">
<table style="width:500px" cellspacing="10" cellpadding="10">
<tr>
<td colspan='3' style='font-size:15px;font-weight:bold'>
My Plugin Settings</span> on your page
</td>
</tr>
<tr>
<td colspan='3' style='font-size:12px;font-weight:bold'>
Use shortcode <span style='color:blue;'>[myplugin]</span> on your page
</td>
</tr>
<tr>
<td>Enter Recipient Email Address </td>
<td>:</td>
<td>
<input type='text' name='email' value="<?php echo get_option('myplugin_recipient_email');?>">
</td>
</tr>
<tr>
<td colspan='3'><input type='submit' value='Submit' name='btnsubmit'></td>
</tr>
<tr>
<td colspan='3'>
<span style='color:<?php echo ($error?'red':'green') ;?>'>
<?php
// Shows Message
echo ($message!=""?$message:"");
?>
</span>
</td>
</tr>
</table>
</form>
<?php
}
?>
The POST data handling part is quite simple, it checks the input email address and calls 'update_option()' function to save it under the name 'myplugin_recipient_email'. If the function 'update_option()' does not find the option 'myplugin_recipient_email' existing, it creates one and save the email address against it.
So, now we have a working settings page, where we can enter and save any email address. Now we have to show a Contact Form at the front-end.
Check the 2nd part of this article here.


